The “Norwegian Method” is all the rage right now due to the success of the nordic athletes especially at the IRONMAN distance. In truth, the top coaches in all endurance sports from Triathlon to Cycling, Running to Rowing and Cross Country Skiing to Swimming have all embraced and used LACTATE TESTING for decades. In fact I’ve been doing this crazy stuff for over 25 years (ouch)! So what’s all the fuss about?
Step 1: Why
When was the last time you took your car to the mechanic for a service but wouldn’t let them run diagnostics on it? Never is the answer! It would be ludicrous to think they could finely tune the engine and get everything functioning properly without some insight as to what the car actually required. The same can be said with your body and your endurance training. In order to get your engine operating at its peak potential we need to look under the hood and run some tests to know for certain what it needs to be at its best.
Your VO2 is the size of your engine. Some people are born with a Ferrari and others a Ford. You can’t change the size of the engine as this determined by genetics but you can tune whatever engine you have to perfection. All human engines are “hybrids”, in that they burn a mixture of fat and carbohydrate depending on the exercise intensity. Fat is the body’s #1 fuel source as it delivers more than twice the energy than carbs, however making Fat available to burn as fuel takes longer. Therefore it’s used for primarily lower intensity fuelling whereas fast burning Carbs fuel shorter more powerful efforts. A well-tuned engine will burn lots of fat for longer and spare it’s carbohydrates until the highest intensities. What you eat also matters and will affect how you burn your fuels. If you put diesel in a Ferrari it won’t run that well! It’s the same with your body but that’s a bigger topic.
Lactate is constantly produced by the body. At rest and in light exercise, the level of lactate produced is small enough that it is used as fuel/ buffered. As intensity increases, lactate production increases and reaches levels that are reflective of a loss of aerobic efficiency. At its simplest, energy in the form of ATP (Adenosine Tri Phosphate) is essential for muscle contraction can be produced via aerobic or anaerobic pathways. One of the anaerobic pathways provides energy quickly but produces excess lactate as a by-product. The scientists are not quite sure exactly the depth of lactate’s role but it is a great marker for efficiency. Therefore, in general, low levels of lactate are the sign of an efficient aerobic system. Over time, with correct training, lactate levels at a given workload will decrease showing an improvement in aerobic conditioning. High Lactate levels at easy workloads are a sign of an underdeveloped aerobic system. High Lactate levels at Maximal workloads are a sign of a well-developed anaerobic system.
For each athlete and sport there is an optimal “Balance” of aerobic and anaerobic qualities. Shaping the correct balance through lactate-guided training is key to reaching your true potential in your chosen sport. We look for 2 specific markers from the lactate test:
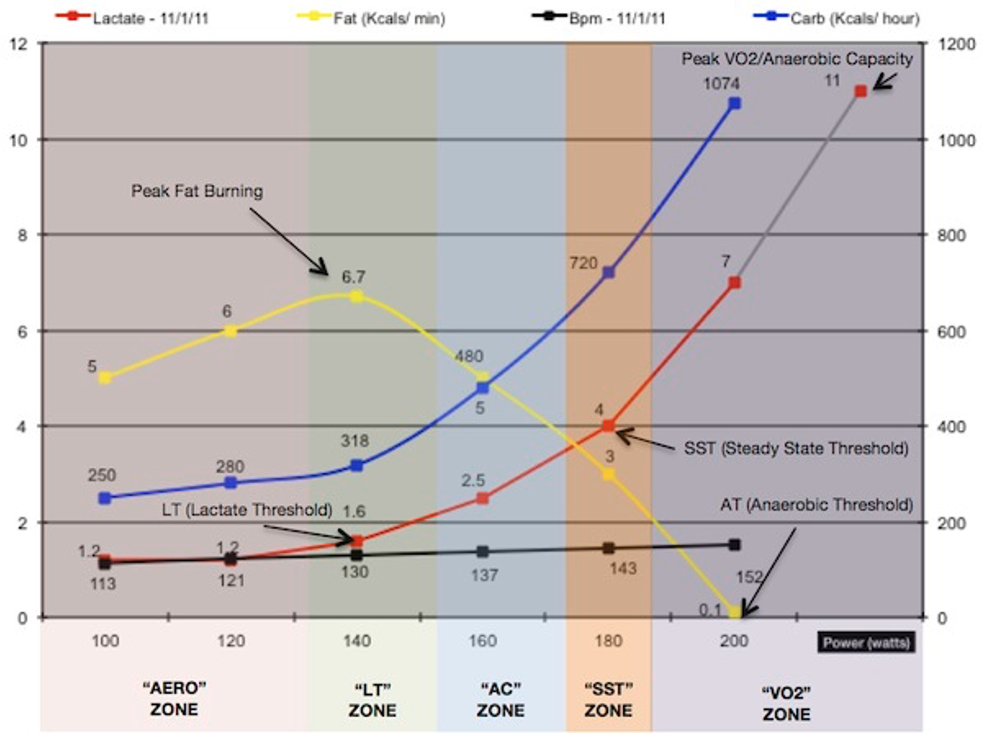
- Aerobic or Lactate Threshold (Aet/ LT1) : this is the first shift away from a baseline of lactate production. It’s a “moderate” effort for most athletes. Usually somewhere between 1.2-2.5 mmol lactate.
- Steady State Threshold or OBLA (SST/ OBLA) : This is the last intensity where lactate concentrations stay the same as time progresses, hence “steady-state”. For many athletes it’s around 3.5-4.5 mmol lactate though that can vary widely. Often there is a spike in lactate production soon after this intensity which helps us to identify it.
So to recap, the Lactate test is where we measure …..
- Aerobic efficiency and stability – the ability to have sustained endurance
- Anaerobic Capacity – the ability to produce power quickly
- The Balance of these qualities in an athlete
Step 2 : HOW
During an exercise test, blood lactate samples are taken along with other key data while you exercise at gradually increasing intensities. This data is then analyzed to create a training prescription to suit your needs. On test day we ask that you don’t do any training prior to coming to the lab. We also want you to arrive well fuelled but having completed digestion so that you are ready to workout. This means that the last meal before the test is about 2 hours prior. Once in the lab, we start you off with at least 10 minutes warm-up at a very easy intensity. If you want to stretch or do mobility exercises that’s fine too.
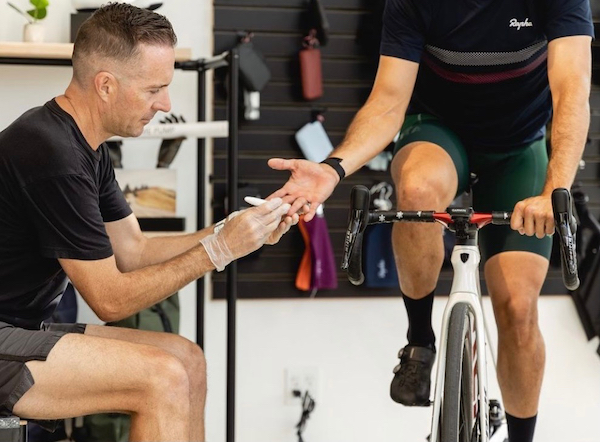
After that we move you through 4-8 stages of gradually increasing efforts depending on your current fitness level. After each stage, we clean your finger and take a one-drop sample of blood from you to analyze lactate levels. The sampling feels like you have been flicked on the finger and is not “painful”….. if 90 year old diabetics can do this to their own finger 5 x a day then it’s really nothing an athlete should worry about! However, people are pleased to know that we always use a new needle for each athlete and follow strict health and safety codes.
At the easier intensities the stages are 4 minutes long, which gives lactate and heartrate chance to stabilize and be a true response to each workload. Once we are past “Threshold” we do a single or several 1 minute efforts to find your peak capacity. We will talk you through the test as it progresses so that you know what is happening, when and why. The whole test lasts usually in the 30-40 minute range.
Tests are sport specific, so for a cyclist we do a bicycle ergometer test (on your own bike), a runner does a treadmill test and the Triathlete does both of these tests and sometimes also a pool based swimming test. The results from each test are often very different. Quite simply this is because every athlete is built differently. Cycling is a non-weight bearing sport whereas running is weight bearing. Also the biomechanics of each sport are vastly different even though it’s the same body/ legs that are at work. This is why you don’t see Kenyan runners winning the Tour de France. The body shape and “recruitment patterns” are unique to each sport’s demands.
We have repeatedly found that the data from the lab and data from the field tests correlate superbly accurately. One of the main advantages of Lactate testing is that it is robust, meaning that it is more stable and less open to big swings in levels from day to day. This is why it’s our #1 test of choice and why we use it to set your optimal training zones which will be based on heart-rate plus power/ pace if you have access to measuring those too.
The tests form the standard benchmarks for “where the athlete is at”. We try to test in a repeatable environment so we can compare tests done throughout the season and against previous years too. Each athlete should retest every 9-12 weeks to monitor progress. Over time we should see :
- Lower lactate at aerobic workloads
- Higher lactate for sprint/ power workloads
- Lower heartrate for a given workload
- Increased peak speed
Step 3 : ZONES
I have zone terminology that is specific to my testing and prescriptions. That’s because I wanted to create zone names that meant something so that you knew why you were training in a zone and what the goals were of training there.
AERO (Aerobic) : this is the “easy” endurance zone where you burn a high % of fat and teach your body to be aerobically efficient. This is below race pace for almost all endurance sports. Most athletes new to accurate training will tell you that this zone often feels “too easy” and that “it can’t possibly help”, but trust it as the gains from this type of work are often the greatest.
AeT/ LT (Aerobic Threshold/ Lactate Threshold) : this is a more intensive type of endurance training. It can feel “moderate” and the goal of training here is to improve your Lactate Threshold and fuel use at this intensity. It’s key for the Ironman, Century rider and marathoner. It is often in this zone where the greatest amount of fat is burned and that carbohydrate use (although rising) is low enough that it can be mostly replenished during the training/ racing.
AC (Aerobic Conditioning) : This is the tempo zone. Here you are still operating highly aerobically but fuel is being burned more rapidly and the effort, therefore strength use, is higher. It is usually sustainable for a 70.3 or half marathon event. This zone is great for hilly training and the strength gains that come from doing it.
SST (Steady State Threshold) : This is the key to your endurance performance. Training here is hard work but the payback is high. Working here builds strength and speed from aerobic sources. It’s the intensity that you start your 10k run or 40km time trial at. For the Olympic distance Triathlete this is race pace
VO2 development : This is the speed zone. Here you burn carbs almost exclusively however, training here has it’s place. It develops your top end speed, maximizes your VO2 and teaches you to tolerate and remove lactate from the body. Key for the mountain biker, crit racer or shorter distance runner. If we can raise this “ceiling” to it’s highest level, it gives us room to advance your threshold more easily. For example, if you can hold 20 mph on a bike for 1 minute, the chances of being able to hold 18 mph for 1 hour is highly unlikely as it’s just too close to your “max”. However, if we raise your max to 25 mph for 1 minute then holding 18 mph will be much more achievable as it will be at a lower % of your peak.
Power : This is used for sprint like efforts. We don’t assign heartrates to this zone as the training done here is too short to be measured with the heartrate monitor. However, we do prescribe power and paces where applicable.
In general, training is done on heartrate for AERO, LT and AC workouts. For SST, VO2 & Power workouts we prefer athletes to use power or pace and adapt these levels once the heartrate response has settled. This is because HR will take about 3 minutes to rise and stabilize at a given intensity, therefore, using HR to do 2 minutes intervals isn’t going to work. People would push too hard to try to make the HR rise at the start of the interval and therefore spike their lactate levels.
Step 4 : APPLICATION
Once we have your data, we can easily see what training stimulus you require in order to hit your goals. So as part of the lab test results we will tell you the various types of training sessions that you should focus on and why. Now, with your heart-rate monitor in hand you can now take this training prescription to the road guaranteeing that your training sessions are optimally performed.
Now, in some quarters, heartrate monitoring has been given a bad rap but it’s mostly inflammatory journalist nonsense rather than being based on sound science. Here’s how it is. Heart-rate tells us how “stressful” a workout is. It also guides us to the intensity of the workout. Power and pace tells us the exact intensity but the heartrate response to that intensity is the most important factor. For example, the goal of endurance training is to teach the body to burn fat. Fat burning requires a low-stress environment. When your heartrate is high is your body more or less stressed? More stressed obviously, so we use the heartrate monitor as a stress-level guide and react accordingly to keep us burning fat. Here are some examples of how the heart-rate monitor helps.
Let’s say your usual response is 150 bpm to produce 200 watts on a bike. You go to ride one day when all conditions appear to be “normal” but at 200 watts your heartrate is 160 bpm. Here the HR is too high for the power which means your body is working harder than it should be.. Perhaps you are getting sick, carrying too high a stress load in general. Here you should back off, reducing power until the Hr settled at 150 bpm
Next imagine a hot day, and for 200 watts you are at 170 bpm. Here you’d back off a little as the HR is running high therefore the stress level is higher than desired. Conversely on a cold day, 200 watts might give you a 140 bpm response. Here the HR response is cold related and if you pushed to higher HR, lactate would rise and fat burning would be limited. So stay at the lower HR. Lastly, on a long training day, you see the HR rise as the session hits hours 3,4, and so on, but power has stayed the same and the effort feels the same. Here the HR is telling you that your core temperature is up and that you need to focus on hydration. Be aware that this session will also require some extra recovery so the training is the days that follow might need amending.
A good training program will be built to suit your physiology, goals, available time to train, travel and ability to recover. It should be a “work in motion” meaning that it changes as you change. If you miss workouts, if sleep is bad or you get sick then the program should be adjusted accordingly. Every workout though should be done using your heartrate monitor and tracked in your training journal. Every 9-12 weeks we ask athletes to get retested so we can check progress and make sure that the training stimulus is correct going forwards. Training with old data can be as bad as training with no data, so be prepared to commit to regular assessments and watch your fitness grow year upon year.