Posts

CONQUERING BACK PAIN

We’ve all felt it – whether in the form of a sudden pinch, a gradual stiffening, or simply waking up to it – yep, it’s back pain. Coming in many shapes and forms, and with even more potential causes, discomfort in the spine is a leading cause of missed workouts and failed programs. Here are three key tips for preventing back pain.


Strengthen Your Core

While training might be seen as a risk factor for back pain, the right exercises performed in the right way can actually be what protects you from it! Strong muscles in your abdomen, obliques, and spine provide the solid core that your back needs for support.

Healthy muscle is both strong and flexible, so don’t neglect the power of stretching before and after workouts. Yoga poses such as cobra (bhujangasana) and cat-cow (chakravakasana) are a great place to start! Try yoga flows that include the poses above, and for core strength, lean on the many variants of plank exercises rather than curls or crunches.


Perfect Your Form

Sacrificing technique for a PR is a surefire way to pick up an injury. Given the role of the spine in “big” lifts such as deadlifts, it’s often an easy victim. When placing your spine in a compromising or challenging position, keep your back as straight as possible and engage your core muscles to do the work. And whether you’re deadlifting or helping a friend move a couch, always remember to engage your legs and glutes to shift the brunt of the load away from your back.

The key word here is control. When training, stretching, or recovering and relaxing, never subject your spine to motions or actions that can’t be done with precision. For example, leaping into high-intensity programs without properly preparing can be much too harsh and sudden, and can easily lead to injury.

And while we’re discussing the importance of form and control, the notion of “(weight) training until failure” should be left in the past. While it can be satisfying in its simplicity, the concept of pushing your body to the point of collapse is inherently flawed. If you truly push your body to the brink, you will absolutely compromise on form and technique somewhere along that journey – and that’s where injury will strike. Muscles coming to the point of collapse means joints that are under an incredible amount of stress and when form inevitably slips… let’s not go there. It’s far more beneficial to work smarter, train with perfect form, and recover with a vengeance.


Address Imbalances

Frequently, a back injury doesn’t originate in the back at all, but is actually caused by weak or injured muscles elsewhere in the body. Your spine can act as a “compensator” – by virtue of being big, strong, and central in the body, it can pick up the slack of other muscles such as the glutes, upper legs, core, and chest.

For example, strong glute activation is crucial in exercises such as squats. If the glutes are undertrained and can’t handle the work, the spine will compensate and may be strained in the process. You may not even notice while exercising, because, well, you did the reps! But you didn’t do them using the muscles you thought, and your lower back might pay the price later. Recurring back pain can often be attributed to a muscle imbalance and subsequent overcompensation on a regular basis.

As with any injury, the answer is never to work through the pain. Don’t train on an injured spine – take a day off and get treated sooner rather than later. Make sure that you’re following good practices outside of the gym too; the office, couch, and bedroom can be just as dangerous.


Engage in a Well-Rounded Training Routine

Creating a training routine that will suit you best may seem daunting and this is where I literally “have your back” (pun intended). I’ll create a custom and adaptive training plan, taking into careful consideration your recovery activities and days as much as your activity.

THE NEED FOR SPEED

The long winter days are behind us and by now you should hopefully have built up a strong aerobic system and fat-burning base. You’ve spent some time in the hills to develop better strength and now you want to maximize the top end of your engine to propel to peak speeds at the races. It’s time to go fast!!

There are many ways to increase speed and peak performance but what’s most important is that you do the correct type of speedwork for you as an athlete and for your chosen sport and distance. Every sport has different demands that need addressing depending on your goals. For example, all cyclists ride bikes but sprinters are (metabolically) built differently to the climbers and time triallists are different to mountain bikers. You can see the same in running where marathon runners are made up differently than milers. In Triathlon, speed for the IRONMAN looks different than speed for a draft legal Olympic distance specialist.

So, first off you need to know where the main focus of your speed development needs to lie. In general, the longer the race the more you want to focus on developing your “threshold” as this is going to be more related to your race pace. If you are a shorter distance athlete then developing your VO2 and lactate tolerance is going to drive more gains BUT …. that said, we must always remember that “complete athletes” develop ALL of their physiology to the best level possible and it’s more that their genetic strengths dictate the type of racing that they are most successful at.

So, often you will see a world class marathon runner PR at 5k before breaking a marathon record. Their focus is the marathon but the speed and biomechanical benefits they get from being able to run a fast 5k still help their larger goal. Same as the athletes who win at the IRONMAN. They have often come from faster paced Olympic distance backgrounds. Ok, so with that noted, how exactly do you develop speed and what can you take away from this article and apply to your own training to get RESULTS? Time to get technical…..

So I divide “speed work” in to 3 main categories :

  1. Threshold
  2. Aerobic Capacity (VO2)
  3. Peak Speed

Threshold

Threshold work is typically done through longer reps performed at your threshold (which as you know is best measured through lactate testing) off relatively short recoveries. The goal is to work hard and fast but at an effort that is sustainable for a longer time. Think of this as 12km pace for a runner, 40k pace on the bike and 1500m pace in the pool. Work at your cycling FTP fits right in here. This type of training is therefore directly related to good 10km, time trials and Olympic distance triathlon racing, not forgetting also that the better your threshold the faster you will be at the longer race distances too.

A good standard threshold set is something like 10 x (5 minutes at threshold off 1 minute of easy recovery). The recovery is just enough to be able to do the reps at the same quality over and over again.

Aerobic Capacity (VO2)

VO2 or “aerobic capacity” training is where you are working above your threshold at fast paces but in such a way to develop speed that is still sustainable. For runners, much of this work is done at “5km target pace”. Here the goal is to move faster than usual to work at speeds that are new to you to extend your top end ceiling and really drive your engine to its max. So, the pace and effort is high and the recoveries about half the length of the rep.

For example, 10 x (2 minutes @ VO2 effort off 1 minute of easy recovery) or you could double this for 10 x (4 minutes @ VO2 effort off 2 minute of easy recovery). The basic rule is to give yourself more recovery than you would for threshold work (so that you can work harder) but not “full recovery” which would allow you to do the reps at too high an effort which would produce higher lactate levels from too much anaerobic contribution. Remember that we want AEROBIC speed from this work.

As a coach I demand 2 things when doing this type of work:

  1. Precise recovery times matched to the length of the interval (2:1 ratio) – never a “jog a lap” recovery, ugh!
  2. “Even splits” (that is “the same pace”) for each of these reps.

This allows us to track sessions over time and know what is improving. For example, if in week one you can run 12 x 400m at 8 minute/mile pace off 1 minute recovery and in week 4 you can do the same set but at 7.40 min/ mile pace then we KNOW that you are improving.

Peak Speed

Peak speed work has its place for every athlete and. Here you do short, very fast work at near maximum efforts off literally as much recovery as you want!! Genius running coach Jack Daniels calls this “rep” work. The goal is to bring together your optimal technique and recruitment patterns at a fast pace. It forces your cardiovascular system to work at peak levels, enhances your ability to produce pure speed and to also flush out lactate effectively and quickly.

In the early phases of training we do “A-lactate” work which is typically less than 8-10 seconds in length and doesn’t stimulate high lactate production which is something we want to avoid when building an aerobic base. Here though, during a speed and peak phase, we want reps that are 30-60 seconds long and really challenging. Taking “total recovery” between reps maintains high speeds and quality of movement. Runners might do 4 x 200m off 3 minutes rest and cyclists 4 x 60 second all out efforts off 5-10 min easy spin.

So, there you have it. Some tricks and concepts to help you get faster BUT as always it’s smart to remind you that this type of training is highly demanding and “the icing on the cake”. It should therefore only be done only once you have a great aerobic base and solid biomechanics.

KNOW YOUR ZONES

Anyone training with science will be using a heartrate monitor and power/ pace to most accurately guide their training. However, “instinct” and a “sense of effort” are also key skills to bring to your training and race pacing. The more information you have to hand, the better the process.


There are also those times when your damn HRM won’t work for some unknown reason and it’s usually when you want it the most!!! In these cases, “RPE” (which is the Rate of Perceived Exertion) is a really useful fall back option. It also helps you better understand how each zone should “feel”.


The RPE scale is defined on a scale of 1-10.  Here is a quick guide on how to interpret your zones based on RPE.


Zone 1 : ACTIVE RECOVERY

RPE = 1 to 2

Little to no resistance/effort.  Typically walking or spinning without exertion.  Can be done all day.  Nothing above normal breathing.

Talk test: can hold a conversation.


Zone 2a:  AERO

RPE = 3 to 5

Light effort.  A long sustainable endurance effort that can be held for long periods of time.  Slight labored breathing above normal.

Talk test: able to talk and converse with slightly higher than normal breathing.

Race Pace : Ultra running


Zone 2b : LT

RPE = 5 to 6

A moderate amount of exertion that can be held for a long period of time.  Breathing is somewhat labored.

Talk test: able to talk and converse with slightly higher than normal breathing but would rather not.

Race Pace : Marathon and Ironman effort


Zone 3 : AC

RPE = 7

A strong exertion that can be held for a moderate period of time.  Breathing is more labored.

Talk test: Short sentences are ok but you are reluctant to hold a conversation.

Race Pace : Half marathon and 70.3


Zone 4 : SST

RPE = 8-8.5

A significant amount of effort that can be held for short intervals or a race like a 5 or 10km.  Heavy breathing.

Talk test: a few words at a time if you really had to.

Race Pace : Olympic Tri & 10km


Zone 5 : VO2 

RPE = 9+

A high level of effort that can only be sustained for very short periods of time such as high performance intervals.  Very heavy breathing.

Talk test: one to two words.

Race Pace : Sprint Tri & 5km


Zone 6 : POWER

RPE = 10

Max effort.  Small maximal bursts up to 30sec.

Talk test: forget it!!!

Race Pace : Sprints

THE DEFINITIVE GUIDE TO HEARTRATE MONITORING


Although Heart-rate monitors (HRM’s) are a common item in most athletes’ kit bags these days, very few people know how to get the best out of them. Many athletes have little idea what the numbers they see actually mean. Some wear their monitor yet completely ignore it, whereas others totally rely on their heart-rate data and forget other key information. Very simply, HRM’s are there to help guide the intensity of your workout. To train specifically and correctly, you’ll need to train in carefully defined “zones”. This article assumes that you already have your zones but need practical pointers on how to use your HRM out on the road. What follows is a brief discussion on some of the factors affecting heart-rate and the remedies you can apply.

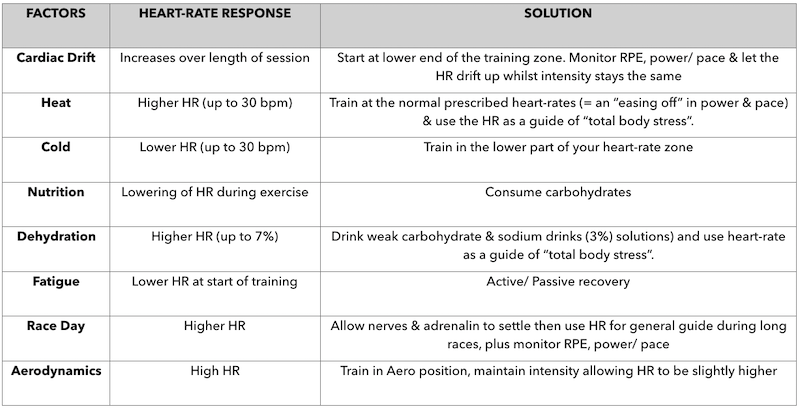
After prolonged exercise at moderate intensities in a normal or warm environment, heart-rate will often rise despite no felt increase in intensity. This is called “Cardiac Drift” and can produce heart-rates up to 20 beats per minute higher than early session heart-rates. The cause is core temperature increase. Here heart-rate does not offer a true reflection of intensity so in this case heart-rate is best used in conjunction with power (on the bike) or pace (on the run) and/ or perceived exertion. The remedy is to start at the lower end of your training zone and over the course of the session allow the heart-rate ro rise up through and slightly above the upper limit of the target heart-rate zone whilst holding constant intensity.

In cold weather, there may be an increase in oxygen uptake with heart-rates staying similar to those of normal conditions. In this case, the body is working harder but this is not shown in the bpm’s on your monitor. Here heart-rate underestimates the intensity. The take home lesson is to train in the lower portion of the prescribed training zones. Hot weather gives much higher heart-rates than usual. This is due to the core temperature increase as discussed in cardiac drift plus the increase in environmental temperature. Increases of between 10 and 30 bpm have been reported in the heat, with no change in actual intensity (watts/ speed). Here again, Heart-rate is not reflecting the true intensity. In this case, the bpm’s shown over-estimate the workload. However, the higher heart-rate is indicative of a higher total body stress as the body works harder to cool and maintain homeostasis. Even though the intensity of a work bout in the heat is not a high as in normal weather, the stress the body is under is increased. Therefore, train at the normal prescribed heart-rates (which will mean an “easing off” in power and pace) and use the heart-rate as a guide of “total body stress”.

Nutrition and calorific intake is critical especially for the long distance athletes. During racing, a lowering of the heart-rate in conjunction with an increase in the perceived effort means that you need to take in calories. In this case, the heart-rate monitor serves as your blood sugar level monitor and saves you from the much dreaded “bonk”. If you find that your heart-rate won’t rise to normal levels early on during training sessions, it’s a good sign of underlying fatigue, especially if your legs feel heavy. In this scenario, cyclists typically find that they are pushing huge race pace gearing but the heart-rate says otherwise. Here you have two choices. Either back off the pace and do a shorter active recovery session or head home for passive recovery.

Dehydration is a common phenomena especially but not solely in the heat. Here the blood plasma volume drops and the heart-rate increases as cardiac output rises. The bpm rise may be between 2 and 7% (that’s up to 160 bpm from 150 bpm). The remedy here is obviously to drink, but also to use heart-rate as a guide of “total body stress”.

For Cyclists and Triathletes, as you strive to make your time-trial position more aerodynamic you may find that your heart-rate at a given intensity has risen. Many think that this means that the new lower position is counter-productive. This is not necessarily so. Research shows that both oxygen uptake and heart-rate are higher in the “aero” position than the standard road position. This is attributed to the increased contribution of the shoulder muscles & a less efficient hip angle. The costs in heart-rate are considered negligible compared to the time savings of improved aerodynamics. Although the heart-rate may be up by 2-5 bpm, it is not a true reflection on intensity so you can allow your heart-rate this “drift” when on the aero-bars, knowing that there has been no real increase in effort. The key here is to train in your aero position & be aware of how it affects you. As long as you can maintain an efficient pedal stroke and cadence and as long as your breathing mechanics are not compromised, the aero position is the way to go for faster times despite the small bpm increase.

On race day, you may find that your heart-rate is up at high levels even when you are warming up. Here the heart-rate is exaggerating the intensity and the adrenalin coursing through your veins is responsible. For Triathletes, they often find that the heart-rate is elevated early on during the bike ride after going from a horizontal position during the swim to upright running then transitioning to the bike. The key here is to train for this transition, but in both these cases the real answer is to wait until you are settled and some time (30mins+) in to your race to let your heart-rate settle down and give you more honest readings. Furthermore, it has been shown that athletes can achieve higher heart-rates during race situations than during training sessions even though the intensity, power or speed produced has remained the same. These race day heartrates again over-estimate the intensity. In all these cases, perceived exertion is a useful tool to use in conjunction with your heart-rate. For short races, I suggest forgetting your HRM completely unless you are recording the bpm to analyze later. For long races, the HRM has many benefits listed throughout this article. In racing conditions often it is your gut instinct that will tell you hard you should go with your HRM providing back-up information and real-time data on the current stresses and conditions you are facing.

The most important message for you to take away from here is that, HRM’s are a great tool but they are best used in conjunction with other information. Heat, dehydration, bike position, biomechanics and day to day biorhythms all affect the numbers you see and some of these affect the intensity you feel. Taking into account all the factors allows you to further maximize your training and take your performance to even higher levels.

HOW TO DO INTERVAL TRAINING CORRECTLY

Interval training is one of the best ways to increase performance across all endurance sports. It is therefore a regular staple in all of my training programs.


During interval training you typically work at higher intensities than you are normally used to sustaining in an effort to increase aerobic capacity and push your fitness to a new level. You do this by doing short “intervals” followed by a brief recovery. Over time as you get fitter you will be able to do longer intervals at the same pace and over time your sustainable pace will increase too. For example, early on in the program you might do:


10 x 2 minutes at a zone 4 (SST) effort with 1 minute recovery between each interval


As you get fitter this session might grow into something like


5 x 4 minutes at a zone 4 (SST) effort with 1 minute recovery between each interval


Here you can see that the length of time at the higher intensity is increased to keep pushing you to become fitter as you adapt to the training stimulus. There are many ways to work with intervals and with me you don’t have to worry about the science behind them so much as how to do them accurately!


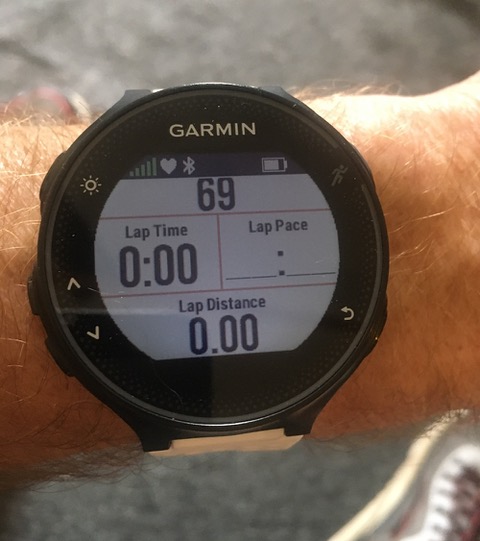
Tip #1 : Always press the “lap button” on your smartwatch at the start and end of each interval


How you should approach these sessions so that you get the most out of them largely depends on the technology you own. That’s because when moving at a set pace/ speed, heart-rate takes about 3 minutes to rise then stabilize. If you are only doing short 1 to 3 minute intervals you can see that heart-rate will not be the correct judge of effort for the interval. Therefore, you need to also use your instinct along with power on the bike or pace on the run to accomplish the repetitions accurately.


Tip #2 : Set up a dedicated screen on your smartwatch so you can see all relevant data with ease

When you start the first interval, simply work at the correct power, pace or effort that is associated with the target training zone. (You will get to know this exactly through the lactate testing that we do ). Over the first few intervals you will see the HR gradually start to come in to zone and stabilize earlier in each interval.


As your session continues, watch to be sure that the heartrate does not go over the upper target for the desired zone. If the heartrate goes too high then lactate production will increase and this will shift your fuel usage and undermine the goal of the training session. Therefore as the session goes on, you might have to ease off the pace/ power to keep the heartrate “in zone”. As you get fitter you will find that you won’t need to ease off the pace and that you are able to complete more intervals at that same effort.


Tip #3 : it’s always better to start a little too easy that to go out too hard!

The Race Day Ritual

RACE PREP FOR TRIATHLON

DON’T TRAIN WHEN YOU ARE SICK

TURBO TRAINING

TRAINING WITH POWER